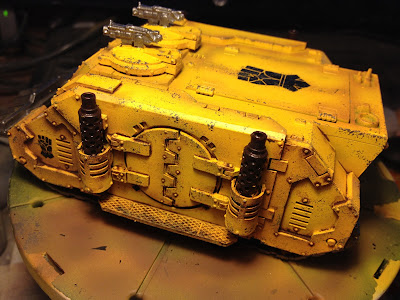
Back before Christmas I foolishly purchased a number of Diemos Rhinos to complement my planned Imperial Fists legion. For a while they just sat in the part opened box while I worked up the courage to tackle the large expanses of yellow necessary.
 |
| Finshed Rhino |
 |
| Undercoat |
First after washing the assembled model in a tab of hot water and a small amount of washing-up liquid to remove any mould release agent, the whole model was given two thin coats of Vallejo White Undercoat with my airbrush.
 |
| Base Yellow Coat |
After leaving the undercoat to dry overnight, the whole model was given a number of thin coats of Yriel Yellow suitably thinned with Vallejo Airbrush thinners. I don't have a specific way of thinning the paint - instead I normally add thinner in small batches until the mixture looks about the consistency of milk. I find this airbrushes pretty well without requiring too many separate coats (which I don't really have the patience for). For thick paints (like GW's Base Paints), I generally use slightly more thinner - and only airbrush in small batches as I find the bigger paint particles tend to clog the nozzle if I'm not careful.
 |
| Flash Gitz Yellow Highlights |
Again, the model was left overnight to let the base coat dry completely. Had I been in a particular hurry, I would have borrowed the resident Lord of Terra's (or should that be terror) hairdryer. A thin coat of Flash Gitz Yellow was sprayed into the center of the main armour plates to give a subtle (and not really visible in the picture above) highlight to the base coat.
 |
| Brown Shading |
Next I added a faint layer of Tamiya Flat Brown into recesses and areas where the amour plates join. I've managed to ruin several models doing this in the past, it's the one step I really dislike doing but without it, I find the model too clean. I've recently started experimenting with using weathering pigments instead but for now, I'm sticking with the approach.
 |
| Look ma, transfers... |
With all the paint dry, I then added damage and wear marks by sponging on small amounts of GW Stormvermin Fur. I concentrated on the areas that would receive the most damage or wear and tear. I generally add the transfers I intend to use at the same time so that the weathering can be included on-top of the transfer.
The larger Forgeworld transfers are great but I've had several problems applying them recently so I take extra care now to apply sufficient Micro Set to both the target spot on the model and the transfer itself to aid application.
 |
| Shiny stuff is... shiny |
Any non-yellow areas are then give the necessary coats of metal (or otherwise) paint. I generally cover the exhaust stacks with a dark brown (GW Rhinox Hide) as I think this looks closer to the heat scorched metal I would expect than a clean metallic colour.
 |
| Brown things are... not |
I have followed Forgeworld's methods for painting models in most cases - one area I follow each time is the use of Burnt Umber oil paint to line and weather the model. I generally use the low surface tension of Oil to 'self line' the main armour panels. Above you can see where the oil paint has been applied.
 |
| More brown weathering |
|
|
Finally I apply a brown wash made up of Oil Paints (Black and brown generally) to the metal areas and concentrate on the track sections.


No comments:
Post a Comment